I always wanted a website where I could post cool things I’ve done or are working on. Not to mention to also host my resume and be a link to all my other social media accounts. Orginally, I was going to host a blog on Wordpress, but I ended up taking it down. Before now, my website was essentially just a single page that used a badly modified theme, plus a link to download my resume. On this new website I plan to post:
- Blogs about what I’m working on: That includes the very blog you’re reading now! I’ll also include at the end a list of problems or roadblocks I encountered and hopefully solutions I found.
- Guides/Tips/Tricks: There probably is already a guide avaliable for whatever I write about, but it doesn’t hurt to practice some technical writing!
- Projects: Any old school projects and future hobby projects, I’ll list them here.
Why Hugo
I decided to switch from Wordpress to a static site generator for two reasons:
- Security: Wordpress runs most of the internet and thus is a large target. My site doesn’t need to be dynamic anyways, I am not hosting a fourm, massive amounts of content, or anything that needs some kind of backend.
- Hosting: I used to pay for hosting services with TMDHosting in Chicago. At the time, it was a pretty good deal for a domain and a shared hosted Wordpress instance. But free beats a good deal. With static pages, I can host on Github Pages and if I want to pay (less) money, Netifly. Or I could selfhost it either on my home server or through a VPS.
At first, I started out with Jekyll, as that’s what Github Pages recommends. It’s pretty barebones and simple. However, I found the documentation to be lacking and some of the things I wanted to accomplish was just too difficult in Jekyll. I read somewhere that Hugo was a good middleground between Wordpress and Jekyll, so I gave it a shot. So far, I don’t hate it. The documentation is pretty extensive, albiet it a little too technical, and has quite a few open-source themes that were easily searchable.
Why not Squarespace, Google Sites, Weebly, Wix, Medium, etc…
I choose to go with a static site generator hosted on my laptop with minimal to no front end to:
- Challange myself: Learning a new system, how it works, how I can change it, and how I can use it.
- Portability: I’m not restricted to one host or service provider, including in any features that one may provide over the other.
- Customization: I have complete control over the pages.
- Cost: Can’t beat $free.95!
Creating a Hugo Website
Here are the steps I would take if I were to make this site again.
1. Pick a theme
This was one of the reasons I picked Hugo: on https://gohugo.io there is an official theme directory that is easily navigatable: https://themes.gohugo.io/. I choose the Stack theme by Jimmy Cai.
2. Check if the theme has a example or starter template
Read the description of the theme on the theme directory, there’s a good change there is a starter template like there is for Stack. Start with that instead of scratch.
3. Install Hugo and setup site directory
Follow this guide on how to install Hugo for your OS: https://gohugo.io/installation/. The quick start guide is also a pretty quick read: https://gohugo.io/getting-started/quick-start/.
I personally have a directory in my home folder called ~/websites. I didn’t realize at the time that I could have just created the website in that directory and didn’t need to make a seperate folder like ~/websites/2023hugosite.
In the folder you would like the website’s directory to reside (for your workspace, not published, don’t put this directory on a websever like /var/www/ on apache), run:
hugo new site mysite.com
cd mysite.com
git init
If you are copying a starter template (for example the hugo-theme-stack-starter), I would clone:
cd mysite.com
git init
git pull https://github.com/CaiJimmy/hugo-theme-stack-starter
4. Customize the website
Configure the website either using the config.toml or TOML/YAML files in ./config/_default. Specifically make sure to configure baseURL at least to your site URL (e.g. https://seuberte.com). Here are all the things you can configure in Hugo: https://gohugo.io/getting-started/configuration/#all-configuration-settings.
Configure the layouts in ./layouts and assets like the CSS ./assets.
If you have theme specific configurations, it’s helpful to look at it’s documentation. For the Stack theme, the documentation on it’s configuration is a bit skim, but there is an example config.yaml at https://github.com/CaiJimmy/hugo-theme-stack/blob/master/exampleSite/config.yaml or an example ./config/_defaults at https://github.com/CaiJimmy/hugo-theme-stack-starter/tree/master/config/_default.
4. Create and organize content
Create directories in the ./content directory (e.g. mkdir ./content/projects). There probably is a posts and page directory already.
To create a new post, you can use hugo new posts/my-post/index.md or hugo new posts/my-post.md. The first creates a page bundle in case you want to add additional page resources (i.e. images, videos, documents, etc…). Both methods will take ./archetypes/posts.md to create the post. You can customize the archetype, but by default it will probably some of the frontmatter configured for you.
5. Deploy website (on GitHub pages)
Problems/Roadblocks Encountered and Miscellaneous Lessons Learned
TOML vs YAML
I thought it would be a good idea to start learning to configure with TOML as it seems Go projects like to use TOML by default. The hugo-theme-stack theme is migrating their main config.yaml to config.toml but it hasn’t been released yet. I used an online conversion tool to convert the config.yaml reference file to config.toml:
baseurl = "https://example.com"
languageCode = "en-us"
theme = "hugo-theme-stack"
paginate = 5
title = "Example Site"
disqusShortname = "hugo-theme-stack"
DefaultContentLanguage = "en"
hasCJKLanguage = false

[languages.en]
languageName = "English"
title = "Example Site"
description = "Example description"
weight = 1

[languages.zh-cn]
languageName = "中文"
title = "演示站点"
description = "演示说明"
weight = 2

[languages.ar]
languageName = "عربي"
languagedirection = "rtl"
title = "موقع تجريبي"
description = "وصف تجريبي"
weight = 3

[permalinks]
post = "/p/:slug/"
page = "/:slug/"

[params]
mainSections = [ "post" ]
featuredImageField = "image"
rssFullContent = true

  [params.footer]
  since = 2_020

  [params.dateFormat]
  published = "Jan 02, 2006"
  lastUpdated = "Jan 02, 2006 15:04 MST"

  [params.sidebar]
  emoji = "🍥"
  subtitle = "Lorem ipsum dolor sit amet, consectetur adipiscing elit."

    [params.sidebar.avatar]
    enabled = true
    local = true
    src = "img/avatar.png"

  [params.article]
  math = false
  toc = true
  readingTime = true

    [params.article.license]
    enabled = true
    default = "Licensed under CC BY-NC-SA 4.0"

  [params.comments]
  enabled = true
  provider = "disqus"

    [params.comments.disqusjs]

    [params.comments.utterances]
    issueTerm = "pathname"

    [params.comments.remark42]

    [params.comments.vssue]
    autoCreateIssue = false

    [params.comments.waline]
    emoji = [ "https://unpkg.com/@waline/[email protected]/weibo" ]
    requiredMeta = [ "name", "email", "url" ]

      [params.comments.waline.locale]
      admin = "Admin"

    [params.comments.twikoo]

    [params.comments.cactus]
    defaultHomeserverUrl = "https://matrix.cactus.chat:8448"
    serverName = "cactus.chat"
    siteName = ""

    [params.comments.giscus]
    reactionsEnabled = 1
    emitMetadata = 0

    [params.comments.gitalk]

    [params.comments.cusdis]

[[params.widgets.homepage]]
type = "search"

[[params.widgets.homepage]]
type = "archives"

  [params.widgets.homepage.params]
  limit = 5

[[params.widgets.homepage]]
type = "categories"

  [params.widgets.homepage.params]
  limit = 10

[[params.widgets.homepage]]
type = "tag-cloud"

  [params.widgets.homepage.params]
  limit = 10

[[params.widgets.page]]
type = "toc"

[params.opengraph.twitter]
card = "summary_large_image"

[params.defaultImage.opengraph]
enabled = false
local = false

  [params.colorScheme]
  toggle = true
  default = "auto"

[params.imageProcessing.cover]
enabled = true

[params.imageProcessing.content]
enabled = true

[menu]
main = [ ]

  [[menu.social]]
  identifier = "github"
  name = "GitHub"
  url = "https://github.com/CaiJimmy/hugo-theme-stack"

    [menu.social.params]
    icon = "brand-github"

  [[menu.social]]
  identifier = "twitter"
  name = "Twitter"
  url = "https://twitter.com"

    [menu.social.params]
    icon = "brand-twitter"

[related]
includeNewer = true
threshold = 60
toLower = false

  [[related.indices]]
  name = "tags"
  weight = 100

  [[related.indices]]
  name = "categories"
  weight = 200

[markup.goldmark.renderer]
unsafe = false

[markup.tableOfContents]
endLevel = 4
ordered = true
startLevel = 2

[markup.highlight]
noClasses = false
codeFences = true
guessSyntax = true
lineNoStart = 1
lineNos = true
lineNumbersInTable = true
tabWidth = 4
Here’s what my orginal config.toml looked like:
main = [ ]

[[menu.social]]
identifier = "github"
name = "GitHub"
url = "https://github.com/seuberte"

    [menu.social.params]
    icon = "brand-github"

[[menu.social]]
identifier = "linkedin"
name = "LinkedIn"
url = "https://www.linkedin.com/in/seuberte/"

    [menu.social.params]
    icon = "brand-linkedin"

[[menu.social]]
identifier = "discord"
name = "Discord"
url = "https://discord.com/users/344712385287684097"

    [menu.social.params]
    icon = "brand-discord"

[[menu.social]]
identifier = "snapchat"
name = "Snapchat"
url = "https://www.snapchat.com/add/seuberte"

    [menu.social.params]
    icon = "brand-snapchat"

[[menu.social]]
identifier = "instagram"
name = "Instagram"
url = "https://www.instagram.com/etrebues/"

    [menu.social.params]
    icon = "brand-instagram"


[[menu.social]]
identifier = "facebook"
name = "Facebook"
url = "https://www.facebook.com/seuberte"

    [menu.social.params]
    icon = "brand-facebook"

[[menu.social]]
identifier = "steam"
name = "Steam"
url = "https://steamcommunity.com/id/etrebues/"

    [menu.social.params]
    icon = "brand-steam"

[[menu.social]]
identifier = "spotify"
name = "Spotify"
url = "https://open.spotify.com/user/seuberte"

    [menu.social.params]
    icon = "brand-spotify"
but I kept getting this error:
ERROR 2023/03/10 22:36:56 unable to cast maps.Params{"social":[]interface {}{map[string]interface {}{"identifier":"github", "name":"GitHub", "params":map[string]interface {}{"icon":"brand-github"}, "url":"https://github.com/seuberte"}, map[string]interface {}{"identifier":"linkedin", "name":"LinkedIn", "params":map[string]interface {}{"icon":"brand-linkedin"}, "url":"https://www.linkedin.com/in/seuberte/"}, map[string]interface {}{"identifier":"discord", "name":"Discord", "params":map[string]interface {}{"icon":"brand-discord"}, "url":"https://discord.com/users/344712385287684097"}, map[string]interface {}{"identifier":"snapchat", "name":"Snapchat", "params":map[string]interface {}{"icon":"brand-snapchat"}, "url":"https://www.snapchat.com/add/seuberte"}, map[string]interface {}{"identifier":"instagram", "name":"Instagram", "params":map[string]interface {}{"icon":"brand-instagram"}, "url":"https://www.instagram.com/etrebues/"}, map[string]interface {}{"identifier":"facebook", "name":"Facebook", "params":map[string]interface {}{"icon":"brand-facebook"}, "url":"https://www.facebook.com/seuberte"}, map[string]interface {}{"identifier":"steam", "name":"Steam", "params":map[string]interface {}{"icon":"brand-steam"}, "url":"https://steamcommunity.com/id/etrebues/"}, map[string]interface {}{"identifier":"spotify", "name":"Spotify", "params":map[string]interface {}{"icon":"brand-spotify"}, "url":"https://open.spotify.com/user/seuberte"}}} of type maps.Params to []interface{}
I switched the file to back to yaml to see if that would fix the issue.
main: []
menu:
  social:
    - identifier: github
      name: GitHub
      url: https://github.com/seuberte
      params:
        icon: brand-github
    - identifier: linkedin
      name: LinkedIn
      url: https://www.linkedin.com/in/seuberte/
      params:
        icon: brand-linkedin
    - identifier: discord
      name: Discord
      url: https://discord.com/users/344712385287684097
      params:
        icon: brand-discord
    - identifier: snapchat
      name: Snapchat
      url: https://www.snapchat.com/add/seuberte
      params:
        icon: brand-snapchat
    - identifier: instagram
      name: Instagram
      url: https://www.instagram.com/etrebues/
      params:
        icon: brand-instagram
    - identifier: facebook
      name: Facebook
      url: https://www.facebook.com/seuberte
      params:
        icon: brand-facebook
    - identifier: steam
      name: Steam
      url: https://steamcommunity.com/id/etrebues/
      params:
        icon: brand-steam
    - identifier: spotify
      name: Spotify
      url: https://open.spotify.com/user/seuberte
      params:
        icon: brand-spotify
I then realized that in the YAML file had the parent menu which it shouldn’t according to Hugo’s docs. Sure enough fixing it made the error go away which made me realize that the issue was [[menu.social]] should have been [[social]]. Because of that realization, I converted the config back to TOML and have been using it without issue since.
SVG Strokecolor for Main Menu Icons
I was setting an menu item for Projects on the sidebar. For some reason the color wasn’t matching the rest of the items:

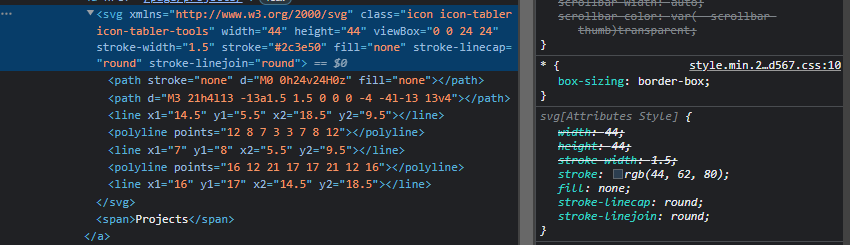 I eventually compared the SVG that I was using for Projects (
tools.svg) and with the Home SVG (home.svg). Turns out that where I was getting the icons was adding a stroke color to the SVG.
tool.svg
<svg xmlns="http://www.w3.org/2000/svg" class="icon icon-tabler icon-tabler-tools" width="44" height="44" viewBox="0 0 24 24" stroke-width="1.5" stroke="#2c3e50" fill="none" stroke-linecap="round" stroke-linejoin="round">
  <path stroke="none" d="M0 0h24v24H0z" fill="none"/>
  <path d="M3 21h4l13 -13a1.5 1.5 0 0 0 -4 -4l-13 13v4" />
  <line x1="14.5" y1="5.5" x2="18.5" y2="9.5" />
  <polyline points="12 8 7 3 3 7 8 12" />
  <line x1="7" y1="8" x2="5.5" y2="9.5" />
  <polyline points="16 12 21 17 17 21 12 16" />
  <line x1="16" y1="17" x2="14.5" y2="18.5" />
</svg>
home.svg
<svg xmlns="http://www.w3.org/2000/svg" class="icon icon-tabler icon-tabler-home" width="24" height="24" viewBox="0 0 24 24" stroke-width="2" stroke="currentColor" fill="none" stroke-linecap="round" stroke-linejoin="round">
  <path stroke="none" d="M0 0h24v24H0z"/>
  <polyline points="5 12 3 12 12 3 21 12 19 12" />
  <path d="M5 12v7a2 2 0 0 0 2 2h10a2 2 0 0 0 2 -2v-7" />
  <path d="M9 21v-6a2 2 0 0 1 2 -2h2a2 2 0 0 1 2 2v6" />
</svg>
To fix it, I just changed the color in the SVG to currentColor. Funny enough, my social icons have the same issue, but the SVG attribute was overriden by the css stylesheet:

I might make a fix and submit a pull request at some point, but it’s not on the top of my priority list.
Use the starter, don’t just install the theme
I made the mistake of trying to create a new site and configure it with the theme; instead I should have cloned and customized this. It would have made it 10x easier instead of configuring from scratch and I ended up referencing it anyways.
Shortcode vs. Partials
Basically, the documentation in my opinion didn’t make the difference between shortcodes and partials clear enough to me. My understanding now is shortcodes are used in exclusivly content, while partials are used exclusivly in layouts/templates. Source: https://jpdroege.com/blog/hugo-shortcodes-partials/
Layouts/Templates
I customized the projects section of the website to use a custom tile layout. I thought I could just put a portfolio.html file in .\layout\ in my site directory, then reference portfolio in the frontmatter of .\projects\index.md. None of that works. But it did help me start to really understand Hugo’s file structure.
Each site has some type of base layout in the layout’s folder. First it starts with exactly that, ./layout/_default/baseof.html If you’re using a theme, it would be in ./themes/[THEME]/layouts/_default/baseof.html. If you do use a theme, just add ./themes/[THEME]/ to the beginning of the path for the theme defaults. Other layouts then extend or override the baseof.html by overriding the blocks in that base.
There are a couple main types of templates in Hugo:
- List Pages
- Content Pages
- Taxonomy Pages
- Term Pages
There a couple more different templates, like a template for the homepage, but those four are what I gathered are the four major pages.
If you are customizing/modifying an existing layout from a theme, you do not change the files in ./themes/[THEME] unless you are developing or modfying the theme. Meaning if you are just customizing the layout for your site, your overrides should be in your site directory i.e. ./layouts.
A content section is a directory in the ./content directory. For example, for the Project’s section of my site, that content is in ./content/projects. Each section will have a list page. By default it is ./layouts/_default/list.html. To override that, I created a layout in ./layout/projects/list.html, created some custom classes, and added some custom CSS.
Relevant Documentation from Hugo: https://gohugo.io/content-management/organization/#path-breakdown-in-hugo https://gohugo.io/templates/ https://gohugo.io/templates/lookup-order/
Scrolling code fences
For long blocks of code (like the configuration files above), nobody wants to scroll that long just to get to the next section of the blog post. One solution is to only post the highlighted code. Another is to make the code scrollable. I think I might try implementing the first one as well, but I chose the second option.
To do so, I created a custom CSS class:
    .scrolling-code{
        max-height: 500px;
        overflow-y: auto;
    }
and everytime I needed a code fence that had a lot of code, I did the following at the beginning of the code fence:
```toml {.scrolling-code}
Start with H2 (##) for headings in posts
When I was writing this blog post, the table of contents was all screwy. I consulted the Hugo documentation and found that the default configuration is to start the table of contents on the second heading (ignoring the first heading). I assume this is basically so the first heading is the title of the document (which makes sense in a lot of markdown text). I basically had two options:
- Increase the heading level of each heading (h1 -> h2, etc…)
- Change the [configuration(https://gohugo.io/getting-started/configuration-markup/#table-of-contents)] to start the TOC at h1
The first option actually makes more sense to me and is probably the convention I’ll start using from here on out in my markdown or LaTeX files.